Fire & SOLAS Training Manual
This is the yacht's everyday reference for dealing with an emergency and for using the safety equipment on board. It's written for every crew member, not just the safety officers — so if something goes wrong, anyone holding this manual should know what to do next.
The manual satisfies SOLAS Chapter III Regulation 35 (life-saving appliances) and Chapter II-2 Regulation 15.2.3 (fire safety training). It is tailored to our yacht by the Master, Chief Officer and crew, so figures, locations and quantities match what you'll actually find on board.
| Yacht Name | M/Y --- | Shipyard | |
| Flag | Port of Registry | ||
| Revision | 2.0 | Date of issue | 20 Apr 2026 |
| Gross Tonnage | Date of Keel Laying | ||
| Company | Yachting Concept Monaco | Office Number | +377 99 90 16 30 |
| Director | Thierry Roux | ||
| Designated Person | Christophe Guegan | 24/7 Phone | +377 99 92 36 48 |
| Company approval | RO approval | ||
| Date | Date |
1. Definitions
A few abbreviations come up again and again in this manual. Worth knowing before you go any further.
| Term | Definition |
|---|---|
| AED | Automated External Defibrillator |
| BA | Breathing Apparatus (self-contained) |
| BYOD | Bring Your Own Device |
| CPR | Cardiopulmonary Resuscitation |
| DPA | Designated Person Ashore |
| ECR | Engine Control Room |
| EEBD | Emergency Escape Breathing Device |
| EPIRB | Emergency Position-Indicating Radio Beacon |
| ETA | Estimated Time of Arrival |
| ETO | Electro-Technical Officer |
| FFE | Fire-Fighting Equipment |
| GA | General Arrangement (plan) |
| GMDSS | Global Maritime Distress and Safety System |
| GPS | Global Positioning System |
| HRU | Hydrostatic Release Unit |
| ISM | International Safety Management Code |
| ISPS | International Ship and Port Facility Security Code |
| LSA | Life-Saving Appliance |
| MOB | Man Overboard |
| Muster Station | The designated spot where you gather in an emergency |
| PA | Public Address (system) |
| PPE | Personal Protective Equipment |
| PSSR | Personal Safety and Social Responsibilities |
| SART | Search and Rescue Transponder |
| SMS | Safety Management System |
| SOLAS | International Convention for the Safety of Life at Sea |
| STCW | Standards of Training, Certification and Watchkeeping for Seafarers |
| UHF | Ultra High Frequency (crew personal radio) |
| VHF | Very High Frequency (radio) |
2. Why We Have This Manual
An emergency at sea is not the moment to start learning how to use a lifejacket or where the nearest extinguisher is. It's the moment to react, calmly and correctly, on muscle memory.
This manual supports that in two ways. First, it's a reference: when in doubt, look here. Second, and more importantly, it's the basis for the drills and familiarisation that actually build the muscle memory. Reading it once isn't enough. The content only works when it's practised regularly in drills.
The emergencies we prepare for on board fall into six families:
- Fire: the most common serious emergency on yachts.
- Damage control: collision, grounding, flooding.
- Man Overboard (MOB).
- Abandon ship: rare, but the one every crew member trains for.
- Medical emergency: remote, with shore help hours away.
- Violence and harassment: preventing violence, harassment, bullying and sexual assault.
- Cyber-security incident: increasingly treated as an emergency in its own right.
Fire and abandon-ship drills are run at least monthly, as required by SOLAS III/19. The Chief Officer maintains the training matrix and makes sure everyone attends.
One closing thought before the content starts: in a real emergency, people who have been trained can still panic. Calm comes from repetition, not from reading. Take the drills seriously — the one that seems most routine is often the one that saves someone's life.
3. Mustering and Emergency Stations
3.1. The alarms: what they mean
The yacht has three emergency signals. If you hear any of them, stop what you're doing safely and react immediately. If you're asleep, get up.
| Signal | Meaning |
|---|---|
| General Alarm Seven or more short blasts followed by one long blast | Muster immediately. Switch your personal radio ON. Wait at the muster station for orders. |
| Fire Alarm bi-tone (2 min in bridge + mess, then vessel-wide) | Officers → bridge. Engineers → ECR. Everyone else: radio ON, await order to muster. |
| Abandon Ship | Spoken order from the Master — or the Chief Officer if the Master is incapacitated — over PA or radio. |
During a drill, each signal is preceded by "For exercise, for exercise, for exercise" on the radio. If you don't hear that announcement, treat the signal as real. A drill that isn't announced is, by definition, not a drill.
Your personal radio is part of your emergency kit. Keep it on you at all times outside cabin rest, keep it charged, and keep it switched on.
3.2. The muster station

::
The muster station is where crew and guests gather to be counted and briefed.
- At sea — the designated deck location shown below. Everyone musters there first for the head count, before being reassigned.
- Alongside — everyone leaves the yacht and musters on the dock, staying until accounted for.
Once you reach the station:
- Arrive properly dressed with shoes on — you'll most likely be given a safety/emergency duty.
- The Chief Stewardess directs guests to the guest muster station, head count and checks their lifejackets are correctly fitted.
- Thermal protective aids and blankets are brought forward when the weather calls for it.
- Keep stairways and passageways clear.
- Anyone needing mobility or medical assistance — crew or guest — is planned for in advance and practised in drills.
3.3. Emergency lighting
When main power drops, battery-backed strip lights come on automatically along the base of every corridor and stairwell. They are mounted low on purpose: smoke and hot gases rise, so a light at low height stays visible — and the air stays breathable — long after the space above is blind. Follow them to the nearest exit; don't stand up looking for overhead signs.
3.4. Escape routes
Every crew member needs to know the yacht's escape routes well enough to use them in darkness or smoke, and to guide a disoriented guest out when necessary.
There are four primary escape routes on this vessel:
- End of the main guest corridor → forward of the wheelhouse.
- End of the crew corridor → external foredeck via the mooring station.
- Bow thruster room → crew corridor.
- Portside aft engine room → main deck wash locker.
Walk them during your on-board familiarisation. Count the doors between your cabin and the nearest hatch — in smoke, you might have to feel your way.
3.5. Emergency Escape Breathing Device (EEBD)

Smoke and toxic fumes kill faster than flames. The EEBD buys you 15 minutes of clean air to get out. Every crew member should know where the nearest one is and how to use it without thinking about it.
- Place the neck strap over your head and centre the bag on your chest.
- Grip the loop on the lid and pull firmly upward — that breaks the anti-tamper tag and starts the air supply automatically.
- Remove the hood from the bag. Stretch the neck seal over your head. Position the nose cup, and breathe normally.
- Leave the space by the shortest safe route. Only remove the hood once you're in clean air. Then go to the muster station.
- If you wear glasses, take care stretching the seal over the frames.
- Tuck long hair inside the hood.
- Listen for the end-of-air whistle — you should already be clear of the hazard by then.
- The EEBD is for escape, not for fire-fighting. It won't keep you alive long enough to attack a fire.
4. Fire Fighting
4.1. The basics of fire

Every fire needs three things: fuel, heat and oxygen. Take any one away and the fire stops. That one sentence is the whole theory — everything else is just applying it.
Different fuels need different treatments, though. Using water on a frying pan full of burning oil doesn't remove any of the three sides of the triangle — it spreads the fire violently. Knowing your fire classes matters.
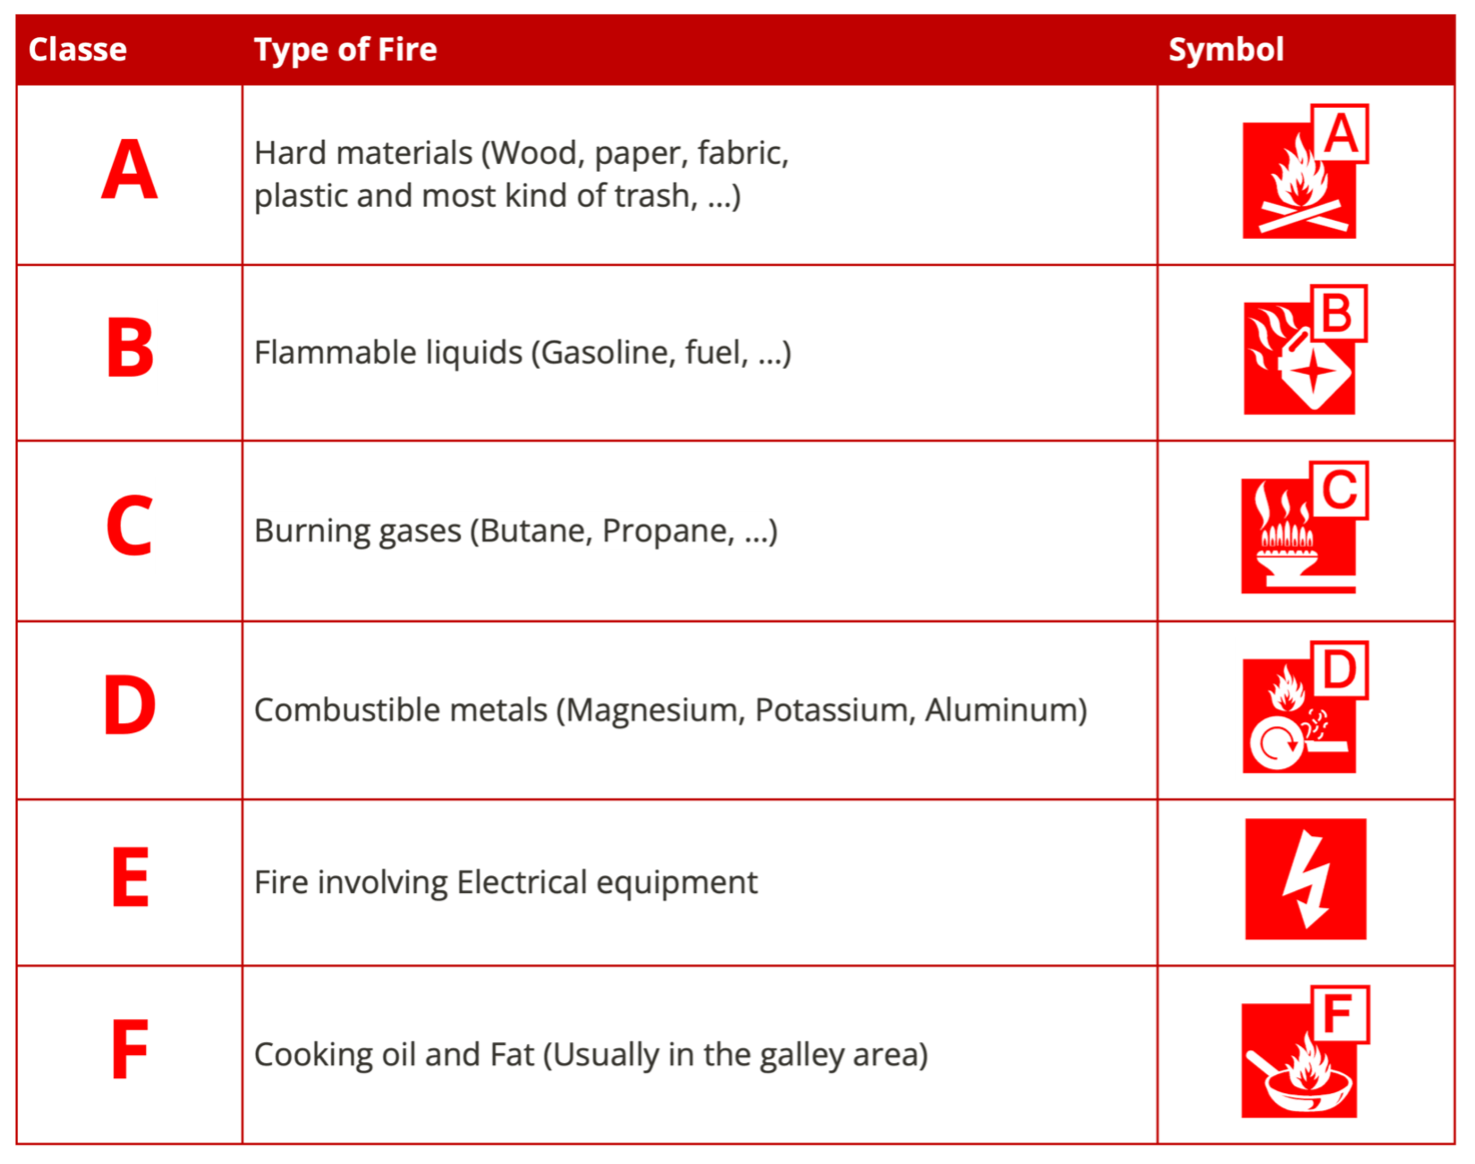
| Class | Fuel | Best agent | Never use |
|---|---|---|---|
| A | Wood, paper, fabric, bedding | Water, water-based foam | — |
| B | Flammable liquids, oil | Foam or CO₂ in enclosed spaces; dry powder | Water jet — splashes fire |
| C | LPG / flammable gas | Stop the gas flow first. Dry powder for small residual leaks. Cool nearby surfaces with water spray. | Foam (won't work), water jet |
| E | Electrical equipment | Isolate first, then CO₂ or dry powder | Water — shock hazard |
| F | Cooking oil / fat | Fire blanket, Class F extinguisher | Water, or moving the pot |
After you think a fire is out, watch it. Re-ignition is common, especially with oil. Keep an extinguisher and a crew member on watch until the surface is cool and the smoke stops.
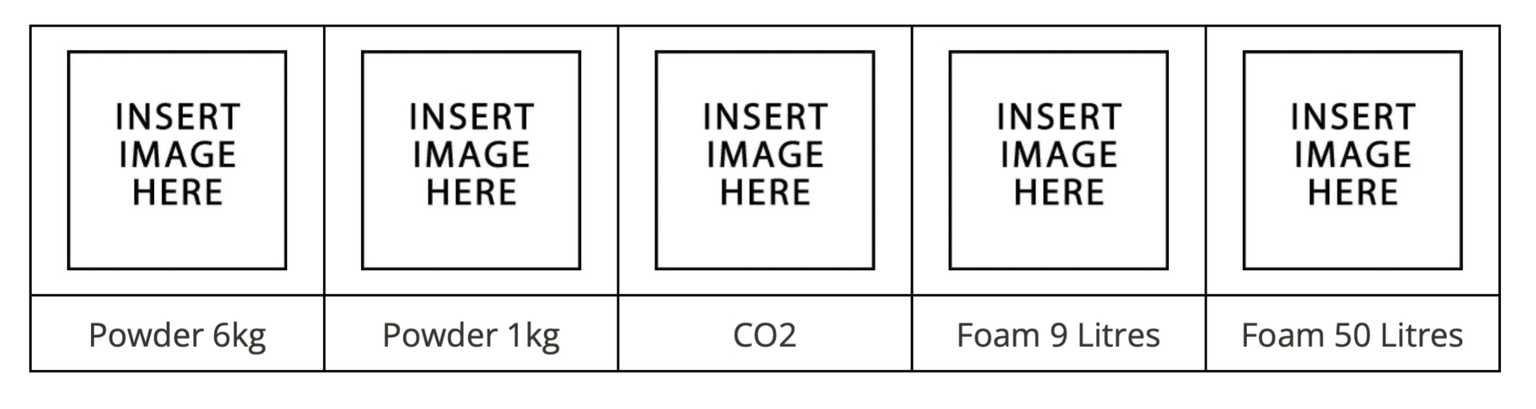
4.2. The agents we carry
You'll find several types of extinguisher on board. Each is a compromise between cooling power, smothering ability, mess and safety around electricity. A quick tour:
Water — the cheapest and most available cooling agent, and what the hydrants and fire hoses deliver. A water jet is excellent for wood and fabric fires but dangerous on oil and electrical fires. Water spray and fog are much safer options — they cool, reduce radiant heat, and can even screen you from a fire while you advance.
Foam is your first choice for burning liquid fuel in a contained space. The trick with foam is not to fire it directly at the liquid — you'll agitate the fuel and spread the fire. Aim it at a vertical surface (a wall or bulkhead beside the fire) and let it flow across the surface to build a smothering blanket.
Dry powder — the familiar ABC extinguisher. Quick, easy, works on most small interior fires. Downsides: the residue is fine, inhales easily, and is difficult to clean up afterwards. Fine for an emergency, not something you'd use for fun.
CO₂ is the agent of choice for electrical fires and for enclosed machinery spaces. It doesn't conduct electricity, leaves no residue, and penetrates tight spots the others can't reach. But CO₂ displaces oxygen — never enter a space that's been flooded with it until it has been fully ventilated.
Fire blanket — simple, fabric, smothers small fires by cutting off oxygen. Our galley blankets are fibreglass and Kevlar, folded for quick release. If you've never had to reach for one, you still should know exactly where it hangs.
Sand is a niche agent — useful only for small spills on a hard surface. You'll see it near bunkering stations.
4.3. Galley fire — the one that matters most

The single most common serious fire on a yacht is a pan fire in the galley. It starts quietly — a wisp of smoke, a bitter smell — and if it's caught at that stage, it's easy. A minute later, it isn't.
If the oil catches fire:
- Turn off the heat first. Don't move the pot.
- Cover it with the fire blanket. The flame dies when it runs out of oxygen.
- If needed, use the Class F extinguisher. It's the only type safe for cooking-oil fires.
- Never pour water on burning oil — it will erupt and spread the fire across the galley.
- Never try to carry the pot outside — burning oil splashing on you or on anything flammable is a much bigger fire.
4.4. Prevention — the cheapest fire-fighting there is
Almost every fire on a yacht starts from something small and familiar — a forgotten pan, a frayed cable, a greasy extractor. None of the items on the checklist below are surprising; all of them are how real fires start.
General housekeeping
| # | Action | Status | |
|---|---|---|---|
| 1 | Suspicious burning smells | REPORTED | |
| 2 | Nearest extinguisher in your area | KNOWN | |
| 3 | Smoking and naked flames near flammables | AVOIDED | |
| 4 | Flammable liquids in proper storage | STOWED | |
| 5 | Spills of flammable liquids | CLEANED | |
| 6 | Oily rags in covered metal container | DISPOSED | |
| 7 | Escape routes kept clear | CHECKED |
Galley
| # | Action | Status | |
|---|---|---|---|
| 1 | Stored oils and fats kept away from heat | STOWED | |
| 2 | Towels and heat pads off the range | CLEARED | |
| 3 | Extractor filters | CLEANED | |
| 4 | Extractor ducting free of grease & fluff | CLEANED | |
| 5 | Appliance and wiring defects | REPORTED | |
| 6 | Stove use under chef supervision only | ENFORCED | |
| 7 | Induction hob never left unattended | OBSERVED |
Engine room
| # | Action | Status | |
|---|---|---|---|
| 1 | Engine room free of loose waste | CLEANED | |
| 2 | Oily waste in covered metal container | DISPOSED | |
| 3 | Flammables not stored near engines | STOWED | |
| 4 | Proper storage used for oils & solvents | VERIFIED | |
| 5 | Hot-work area cleared of flammables | PREPARED | |
| 6 | Fire watch present during hot work | ASSIGNED |
5. Fire-Fighting Equipment
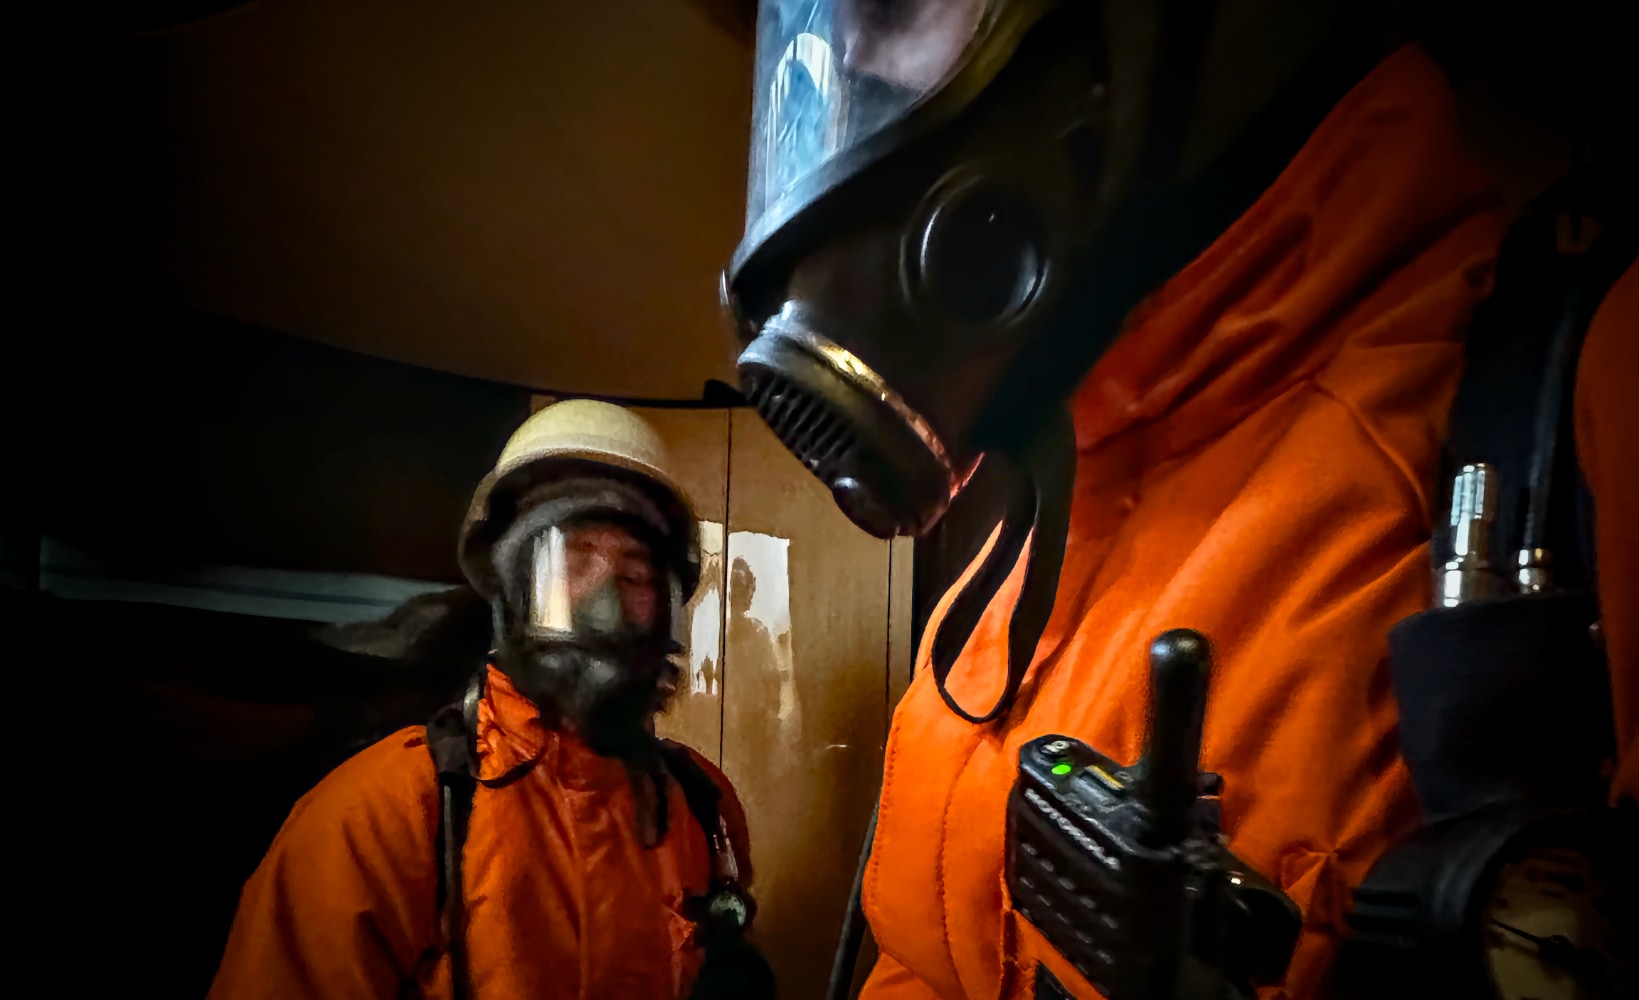
5.1. Fireman's outfit
Two complete outfits are stowed at the Fire Station on the main deck aft starboard. For any fire in an enclosed space where you can't see what's burning, the outfit and BA aren't optional — they're the only way to investigate safely.
Each outfit contains:
- Heat-resistant, water-resistant protective clothing
- Rubber boots and non-conducting gloves
- Safety helmet
- Hand lantern with at least 3 hours of run time
- Fire axe
- Self-contained compressed-air BA (cylinder ≥ 1,200 L, ≥ 30 min) with 2 spare cylinders
- Fireproof lifeline with snap hook for the safety harness
5.2. BA Control Board

When someone enters a fire in BA, someone else — the BA controller — tracks them. That's what the control board is for.
The Chief Officer runs the fire team. A yellow tally is filled in for each fire-fighter with their name and cylinder pressure. Just before entry, the controller logs the "time in" on the tally and inserts it into the board. Using the pressure-to-time table, the controller calculates how long the fire-fighter's air will last, and notes the expected "time of whistle".
That's the moment by which they must be back out. If they're not, a rescue team goes in. Communication runs from the fire team to the controller at the entry point, and from the controller to the bridge.
5.3. Portable and fixed systems
Every crew member should be familiar with every type of portable extinguisher we carry onboard — not just the one nearest their cabin.
The vessel has 26 fixed fire stations, each equipped with:

- a hydrant and isolation valve,
- a 15 m hose,
- a nozzle and
- a locking key.
Learn where each one is. In a smoke-filled corridor, you don't want to be looking for the cabinet.
5.4. Water sprinkler system

The sprinkler system is our automatic first line of defence for accommodation fires. A pressurised fresh-water tank — kept at no less than 12 bar at the highest sprinkler head — feeds pipework throughout the interior. Each sprinkler head holds a small heat-sensitive bulb that bursts at its rated temperature, releasing water onto the fire. A sea-water pump backs up the tank so the system keeps going once the pressurised reserve is spent.
Some spaces where an accidental wet release would be disastrous are on dry sections — they only activate with manual control or a confirmed secondary heat sensor. Those spaces are:
- Wheelhouse
- Rack room
- 2 × fridges
- Engine room
Every zone has an isolation valve, so if a head is broken accidentally you can shut that zone off without losing the whole system. Know where yours is and how to close it.
6. Lifejackets, Immersion Suits and Lifebuoys
6.1. Lifejackets — the one piece of kit everyone needs to know
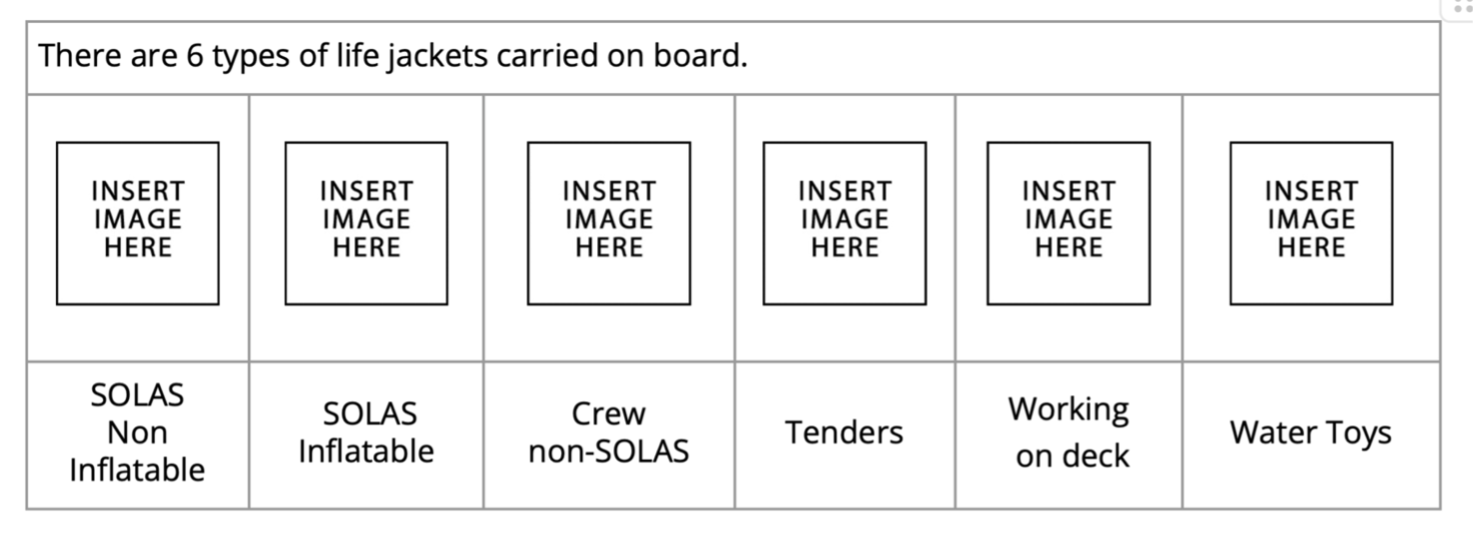
The red SOLAS lifejackets are the only jackets on board that meet the Convention. They have a light, a whistle and reflective tape, and they will turn you face-up in the water even if you're unconscious. Everyone on board must know where they're stowed and how they're worn.
Donning one should take less than a minute:
- Slip it over your head.
- Fasten and tighten the straps to your size.
- That's it. The whistle is already on the jacket; the light activates automatically in contact with sea water.
We carry several other types of jacket for specific situations — none of them are SOLAS-equivalents:
- Non-SOLAS inflatables live in each crew cabin. Use them for tender transfers, rough-weather work and when the Master calls for them.
- Tender-packed inflatables are single-use, sealed in the tenders. Only for a tender emergency.
- Deck-work inflatables are mandatory for tender driving, window cleaning, stern-platform work and anything similar. No exceptions.
- Water-toy floating aids give buoyancy for water sports. They're not life-saving equipment and they won't save anyone in an emergency. They are mandatory for jetski use and towed toys.
6.2. Immersion suits

The immersion suit is what protects you from cold water after you abandon. On board we carry 55 + 5 oversized suits — more than one per person. Guest suits are under the outer seats of the upper deck aft; crew suits are under the outer seats forward of the wheelhouse. In an abandon-ship they are distributed at the muster station.
Each suit gives you roughly an hour of thermal protection and — critically — eliminates the cold-shock reflex that kills so many people in the first seconds of water entry.
Step 1

Lay the suit flat in front of you, zipper facing up.
Step 2

Lay the suit flat in front of you, zipper facing up.
Step 3

Lay the suit flat in front of you, zipper facing up.
6.3. Lifebuoys

Life rings are made from indestructible material, with high-reflective bands so a searchlight finds them easily.
The ones either side of the wheelhouse have combined orange smoke canisters and strobe lights — in a man-overboard, those are the first things you throw. Two more have floating lights; two others are attached to painter lines so they can be pulled back to the yacht.
7. Abandon Ship
7.1. Before anyone leaves
Abandoning ship is rare — and it's almost always a last resort. The yacht itself is usually the best life raft. Before the order is given, the Master will have done everything possible to keep the yacht afloat, fight the fire, or stay with her.
When the order does come, it comes from the Master — in his incapacity, from the Chief Officer. Nobody else. Before that point:
- Everyone is mustered and correctly dressed in lifejackets or immersion suits.
- Missing persons are reported, with a last-seen location.
- Guests are kept calm — no time for luggage, nothing to pack.
- Stairways and passageways stay clear.
7.2. The life rafts

We carry 6 life rafts, each rated for 20 people, stowed on the bridge deck aft.
The Chief Officer assigns rafts and coordinates launch at the muster station. A senior crew member acts as Captain of each raft.
Step 1

1. Check the painter is made fast to a strong point (the HRU). If the yacht sinks before the raft is manually released, this is what inflates the raft automatically.
Step 2

2. On the Chief Officer's order for your raft, release the pelican hook and the snap shackle.
Step 3

3. Lift the raft manually and throw it overboard. Stay clear of the painter.
Step 4

4. Pay out the painter all the way — it's longer than you expect. At the end, give it a sharp pull to trigger inflation.
Step 5

5. When the Master orders boarding, enter the raft via the entrance. Jumping in keeps you dry.
Step 6

6. When everyone is aboard, cut the painter and move clear of the yacht.
Step 7

7. Help anyone still in the water.
Step 8

8. If the raft has inflated upside-down, one deckhand rights it from the water.
Equipment to bring across from the yacht:
| # | Action | Status | |
|---|---|---|---|
| 1 | Drinking water | ||
| 2 | High-energy food (avoid protein — it takes water to digest) | ||
| 3 | Survival blankets | ||
| 4 | EPIRB | ||
| 5 | SART | ||
| 6 | Medical bag | ||
| 7 | Portable GPS | ||
| 8 | Portable VHF radios | ||
| 9 | Logbooks and vessel certificates | ||
| 10 | Passports | ||
| 11 | Pyrotechnic flares |
What is already in every raft (SOLAS LSA Code): a rescue quoit with 30 m buoyant line, a buoyant safety knife, a buoyant bailer, two sponges, two sea anchors, two paddles, three tin openers, a first-aid kit, a whistle, four parachute flares, six hand flares, two buoyant smoke signals, a waterproof torch with a spare set of batteries and bulb, a radar reflector or SART, a signalling mirror, the life-saving signals card, fishing tackle, a food ration and 1.5 litres of fresh water per person, a graduated cup, anti-seasickness medicine and bags per person, survival instructions, an immediate-action card, and two thermal protective aids.
Maintenance matters. Life rafts are never hosed down during deck-wash. Rough handling — dropping, rolling — damages seals. Each raft goes to an approved service agent annually, with the certificate kept alongside the other ship's certificates. The Hydrostatic Release Units are replaced every two years.
7.3. Survival — what matters most, in order
After you leave the yacht, four things matter. In this order:
- Protection — from cold and exposure.
- Location — being findable by rescuers.
- Water.
- Food.
You can live days without water and weeks without food. Cold kills first. The single biggest mistake a survivor makes is underestimating how fast the body loses heat.
Before you end up in the water or in a raft — dress for it. Fleece or wool beats synthetics. Layers beat a single thick garment. A waterproof outer layer dramatically reduces cold shock when you enter the water. Trapped air between layers actually aids buoyancy — so don't strip off thinking clothing will drag you down. It won't.
Make these adjustments on the way to the muster station, not after you've arrived.
8. Survival in the Raft
8.1. If you're in the water

Get into a raft as fast as you can. The risk of being hit by wreckage coming up from a sinking yacht is real, but it's still smaller than the risk of staying in cold water.
If there's no raft, don't swim uselessly. Every stroke burns body heat you can't replace. Float still with your knees drawn up and your arms at your sides — this is the HELP position. Blow your lifejacket whistle to attract attention.
If several of you are together, loop arms through each other's lifejackets and intertwine legs. You lose less heat that way, and a group is easier to see from the air than a single person.
8.2. Getting into the raft
It's harder than it looks from the raft. Your thigh muscles are the strongest part of you when you're cold, so use them. Push yourself down under the water, let the lifejacket bob you up, and use that momentum to kick up into the raft. The same trick works for someone trying to help you from inside.
8.3. Once you're aboard — the first hour
The first hour sets up the rest of the ordeal. Work through it methodically:
- Clear the yacht. Cut the painter as far from the raft as possible — the safety knife is near the entrance, designed so it can't accidentally damage the raft. Paddle away from floating wreckage.
- Group up. Rafts together are easier to spot. About 10 metres apart is enough to allow for wave motion without snatching.
- Stream the sea anchor. It slows your drift and keeps the raft entrance away from the weather.
- Close the entrances. Remove wet clothing, wring it out, put it back on — it still insulates. Bail out any water. Inflate the floor for extra insulation.
- Check for damage and leaks. Keep a small opening for ventilation.
- Seasickness tablets — now. Even experienced sailors get sick in a life raft. Sickness costs you body fluid you can't easily replace.
- Appoint a leader if a senior officer isn't present. Somebody has to make calls and organise watches.
8.4. Attracting attention
One person maintains a visual lookout at all times. Distress signals are only used when there's a real chance of being seen or heard — flares burn out fast, and you only have so many.
8.5. GMDSS equipment
These three pieces of electronic kit are how you tell the outside world where you are.
- 2 × SART. Mount one high in the raft. Don't activate it until you know a search vessel or aircraft is in the area — its battery is not infinite. When it's switched on, a SART paints a line of dots on a searcher's radar, leading to your position.
- 2 × GMDSS handheld VHF. These live in the wheelhouse and get brought into the raft. Use only one at a time to conserve batteries. Monitor channel 16 only. These are emergency radios — never for routine comms.
- One EPIRB, stowed outside the wheelhouse on the starboard forward side, in a free-floating cradle. If the yacht sinks unexpectedly, it releases automatically and begins broadcasting distress to satellites. In a controlled abandon-ship, it comes into the raft with you. Only the Master or Chief Officer gives the order to manually activate it.
8.6. Pyrotechnics
Stowed in the wheelhouse. Four types, each with its own purpose.
| Type | Qty. | What it's for |
|---|---|---|
| Red parachute flare | 6 | Long-range distress, day or night. Altitude ~300 m, 40-second burn, visible for miles. |
| Red hand flare | 12 | Short-range distress at night. Good for pinpointing position once help is near. |
| Buoyant orange smoke | 3 | Daytime distress or wind-direction marker. Burns ~3 minutes. Useless in strong wind or at night. |
| White anti-collision flare | 12 | To avoid collisions — not a distress signal. |
A few rules that all flares share:
- Learn each one before you ever need it. In a life raft is not the time to read the label.
- Follow the label instructions exactly.
- Point it outside the raft. Burning pyrotechnics can puncture the fabric.
- Parachute flares: never fire if an aircraft is in the vicinity.
- Use distress signals only when a rescuer is likely to see them — otherwise, you're wasting the limited stock.
Out-of-date pyrotechnics are landed ashore. They are never fired for practice — that is illegal. Return them to the supplier, to a life-raft service station, or to the local coastguard or police.
8.7. Settling into a survival routine
A routine keeps people alive. Boredom, cold and hopelessness kill morale, and morale keeps you going.
- Set watches in pairs, roughly an hour each. One person on outside lookout, one inside managing the raft — attending to the injured, collecting rainwater, looking after equipment and valuables.
- Rotate the lookout often so nobody gets too cold. Dress them for the weather and secure them to the raft.
- Keep a roll call and a log — head count, circumstances of abandoning, missing persons, duties, rations issued, first aid given, and the condition of each survivor. When rescue comes, this is priceless.
- Lookouts watch for ships, aircraft, land, other survivors, and useful debris — anything the raft can use. Distress signals stay dry but within reach.
8.8. Water
Water is the single most important ration you have. The rafts carry 1.5 L per person — about enough for four or five days if you're disciplined.
- First 24 hours: no issue except to the sick or injured. Your body has enough water for a day; what you save now matters later.
- From day 2: 500 ml per person per day, in three parts — at sunrise, noon and sunset. Sip slowly; swish it around your mouth before swallowing to get the most from it.
- Rainwater is everything. The canopy has drainage tubes inside. When rain comes, discard the first run-off — it will be salty from spray on the canopy — and then collect what you can. Condensation on the underside of the canopy can be collected with a clean cloth (not one you've used for salt water).
- Never drink seawater. Your kidneys need fresh water to excrete the salt, so you lose more water than you gain.
- Never drink urine. It contains what the body already rejected.
- Fish, seaweed and seabirds are all salty. Don't eat them unless you have at least an extra litre of fresh water to spare.
8.9. Food
Food isn't as urgent as water, but it supports morale and helps the body conserve water.
- No issue in the first 24 hours.
- From day 2, ration 100–125 g per person per day, divided across the same three meals as the water.
- Typical rations are barley sugar, glucose tablets and biscuits — chosen because they digest with very little water.
- The raft has fishing tackle. Most open-sea fish are edible, but avoid anything with spines, spikes or bristles — those are often venomous. Don't fish near sharks, and stop if one appears.
8.10. Medical issues in the raft
Priorities, in order: stop bleeding · prevent hypothermia · keep morale up. With no doctor and no pharmacy, simple measures done well save lives.
| Condition | What to do |
|---|---|
| Shock (feeble pulse, pale, faint) | Control bleeding. Lay flat, elevate legs if conscious. Recovery position if unconscious. Reassure. Prevent shivering without overheating. |
| Severe bleeding | Expose the wound. Sterile dressing. Firm hand pressure. Add padding if bleeding soaks through — don't remove the first dressing. |
| Burns | Cover with sterile or paraffin gauze. Any burn over 10% of body surface is dangerous; over 33% is often fatal. Treat for shock. Small sips of fresh water if conscious. |
| Fractures | Immobilise with bandage, sling or splint. Pain relief. Treat for shock. |
| Fuel-oil contamination | Clean skin as best you can. Wash eyes. Rest, warmth, fresh air for lungs. Milk or water if vomiting. |
| Frostbite | Warm affected part with your hand — do not rub. Keep it protected. |
| Sunburn / heat stroke | Under cover. Wet clothing, then dry. Sips of water. Splash water on the canopy to cool the interior. |
| Immersion foot | Keep feet warm and dry. Elevate. Wriggle knees and ankles to maintain circulation. |
| Salt-water boils | Do not burst. Keep clean and dry. |
| Dehydration | Reduce activity. Shade. Sip your ration. Collect rainwater. Never substitute seawater. |
| Bodily functions | Urinate within the first few hours, then at least once a day. Dark, smoky urine is normal in a survival situation. Several days without a bowel movement on emergency rations is normal — don't worry about it. |
9. Rescue Methods
9.1. Ship-to-ship line-throwing

We carry four line-throwing devices on board. They're used to pass a line between two ships when the sea state won't allow a closer approach.
The method is straightforward, but the recoil is significant — brace the unit against your knee or a rail so your aim doesn't move.
- Remove the front cover. Point the arrow in the direction of firing, hand clear of the trigger.
- Make the cord fast to a heavier line and secure it to the yacht. Small cap in place.
- Remove the safety pin. Brace the unit. Fire over the other vessel's deck.
- If the other ship is a tanker, approach from leeward and prepare to receive the line instead of firing over her.
- Never fire a line-throwing rocket when a helicopter is in the vicinity.
- If it misfires, hold it in the firing position for a full minute before disposing of the canister overboard.
9.2. Helicopter rescue

Most helicopter rescues go smoothly because both sides know what they're doing. Problems start when someone improvises.
The Master holds the vessel on a steady course, with the relative wind 30° on the bow — port side if the rescue area is aft, starboard side if it's forward. The rescue area is cleared of loose gear. A flag (illuminated at night) shows the wind direction. The area is lit at night.
A few rules that the helicopter crew will rely on you following:
- Touch the winch man, the stretcher, or the hook until it has touched the deck and earthed.
- Secure any line lowered from the helicopter.
- Fire rockets or line-throwing appliances while the helicopter is working.
- Transmit on the main radio during winching.
- Shine a light at the helicopter at night.
Rescue happens in one of three ways:
- Winch man lowered — he attaches the strop to the casualty and both are winched up.
- Strop lowered alone for the casualty to don himself.
- Rescue boat or raft launched clear of the yacht if the masts and superstructure would foul the winch wire.
Using the strop yourself:
- Put your arms and head through the loop.
- The padded part sits high on your back; the two straps come under your armpits and up in front of your face.
- Pull the toggle down as far as it goes.
- Thumbs-up to signal you're ready.
- Keep your arms down by your sides.
- At the helicopter door, do exactly what the crew tell you, without asking questions.
In bad weather, the strop may be hard to place on deck. In that case the helicopter lowers a rope extension first. The deck crew haul in the slack as the winch wire pays out, keeping the rope coiled on deck. Do not make fast — the helicopter has to stay free to move. As the casualty is hoisted, keep the rope taut. Injured casualties are lifted in a rigid stretcher with straps fastened to prevent falls.
10. Medical Emergencies
Yachting combines high-risk activity — diving, jetskis, tenders, chainsaws, extreme guests — with complete isolation from shore medical support. A well-trained crew is the only immediate care available when something goes wrong.
Every crew member holds STCW Basic Training including elementary first aid. Deck officers hold Medical First Aid (STCW A-VI/4-1) or Medical Care (A-VI/4-2). But everyone on board should know the basics of the first few minutes — that's what this section is for.
10.1. Scene safety and patient assessment

When you reach a casualty, don't lunge straight in. Taking ten seconds to read the scene saves lives — starting with your own.
Safety first. Your safety, then the rest of the crew, then the casualty. If the scene is hazardous — fire, fumes, electricity, moving machinery, blood — don PPE or clear the hazard before you approach. Request help over the radio. Only move the casualty if the scene can't be made safe.
Look at the situation. What happened, when, and how? Was there a fall, a burn, a penetrating injury? How many people are involved, and how old are they? This information is what you'll pass to the telemedical service.
10.2. Primary survey — the ABCDE
Once the scene is safe, run through the primary survey. Every crew member uses the same sequence — that way, nobody misses anything and nothing is done twice.
| Step | What you're looking for |
|---|---|
| A — Airway | Is the airway obstructed? Snoring or gurgling sounds point to a blockage. Open the airway with head tilt and chin lift. |
| B — Breathing | Rate, depth, symmetry. Sweating, blue lips (cyanosis), use of neck and chest muscles to breathe. Any injury to the chest wall? |
| C — Circulation | External or internal bleeding. Colour and temperature of the hands and fingers — blue, pale, or mottled skin is a warning. |
| D — Disability | Level of consciousness. Pupils — size, equality, reaction to light. Recovery position if unconscious. |
| E — Exposure | Reveal the injury. Protect the casualty's dignity and body heat. Get consent from conscious casualties. Head-to-toe examination if unconscious or seriously hurt. |
Reassess the casualty often. Their condition can change quickly, and the crew needs to be reading the same picture.
10.3. Cardiac arrest — basic life support

Cardiac arrest is what happens when the heart suddenly stops pumping — usually because of an electrical problem. The brain runs out of oxygen within seconds, and the casualty collapses without warning. Within minutes, brain cells start to die.
Don't confuse it with a heart attack. A heart attack is a blocked coronary artery — usually with warning pain in the chest, arm, back or jaw, and the casualty usually stays conscious. Cardiac arrest has no warning and the casualty always loses consciousness.
The first few minutes matter more than anything else. If you start CPR quickly and the AED is deployed fast, the casualty has a real chance. If CPR is delayed, the chance collapses.
The sequence:
- Shout for help and make the scene safe.
- Check response. Shake the shoulders, ask loudly "Are you all right?"
- No response? Open the airway with head tilt and chin lift. Look, listen and feel for normal breathing for no more than 10 seconds. Agonal gasps and brief seizure-like movements are not breathing — they're a sign of arrest.
- Not breathing normally? Call for the ambulance or telemedical service, and get someone to bring the AED.
- Chest compressions. Kneel beside the casualty. Heel of one hand on the lower half of the sternum, other hand on top, fingers interlocked. Arms straight, shoulders vertical over the chest. Press 5–6 cm deep, at 100–120 per minute. Release fully between compressions, but don't lift your hands off the chest.
- Rescue breaths. After 30 compressions, open the airway again. Pinch the soft part of the nose, seal your lips around the casualty's mouth, and blow steadily for about a second — enough to see the chest rise. Let the chest fall; give a second breath. The two breaths together should take no more than 5 seconds.
- 30:2 — keep going. Don't stop to recheck unless the casualty starts moving or breathing normally on their own.

Using the AED:
- Move the casualty out of standing water. Dry the chest if it's wet.
- Pad sites should be hair-free — shave only if needed.
- Take off large metal jewellery from the chest area.
- The casualty mustn't be on anything conductive.
- Nobody touches the casualty during analysis or the shock. Chest compressions can continue while the AED sets up and charges — that's a change from older guidance.
- Adult pads are fine from age 8 upward. For children aged 1 to 8, use paediatric pads; for smaller children, place one pad on the chest and one on the back.
10.4. Choking
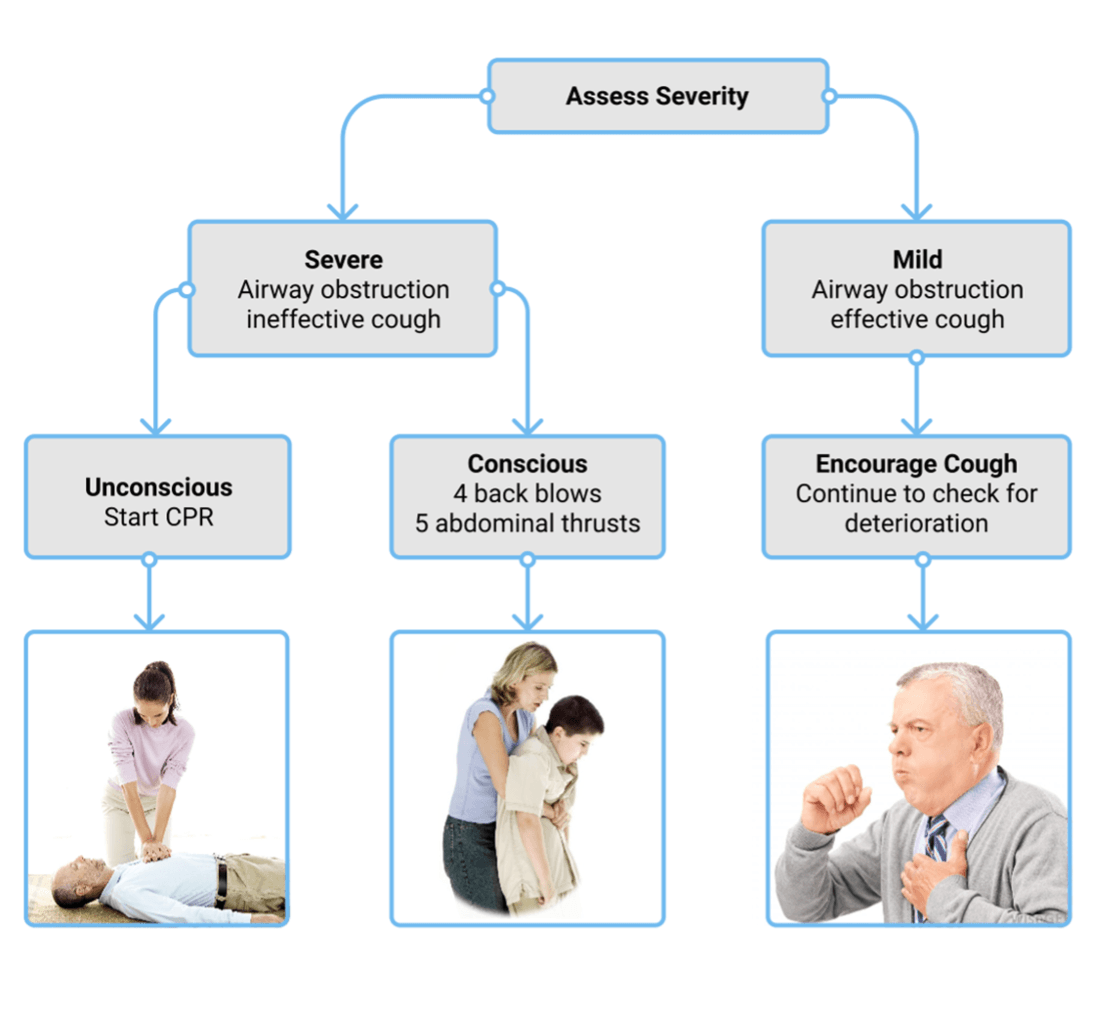
Choking usually happens at a meal. The first question is the most useful: "Are you choking?"
| Severe obstruction | Mild obstruction |
|---|---|
| Can't speak. May nod. | Can speak, cough and breathe. |
| Silent or weak cough. Cyanosis. Heading toward unconsciousness. | Effective cough — encourage them to keep coughing. |
If severe and conscious: 5 back blows between the shoulder blades, then 5 abdominal thrusts (the Heimlich manoeuvre). Alternate until the object clears or the casualty loses consciousness.
If unconscious: start CPR. Every time you open the airway, check the mouth for the obstruction — don't do blind finger-sweeps, which can push it deeper.
10.5. Preparation — before you need any of this
The best medical response is built before the emergency:
- An up-to-date emergency contact list (telemedical service, nearest port medical facility, poison-control centre) is posted in the wheelhouse and crew mess for the area you're operating in.
- The grab-bag with oxygen and the AED is in an easy-to-reach location that everyone knows.
- As soon as crew numbers allow, a scribe is appointed. Their job is to record the incident in real time — the time of the incident, the casualty's condition and how it changes, who was called and when, ETAs, treatment given, vital signs, and any known medical history or allergies. This record is the difference between a useful handover to the receiving hospital and a chaotic one.
11. PSSR — violence and harassment at sea
From 1 January 2026, STCW Basic Training includes mandatory content on preventing violence, harassment, bullying and sexual assault on board.
In practical terms, every seafarer on board now holds (or will hold after their next revalidation) training that covers recognition, reporting, prevention and bystander action for these behaviours. It is a core safety competence, no different in status from knowing how to use an extinguisher.
The yacht's own policy is:
- An anti-harassment policy signed at the highest level.
- At least two confidential reporting routes that bypass the line of command — a named contact on board, plus the DPA.
- The investigation process and the protections against retaliation.
- The training schedule for each season.
If you experience or witness any of this, use one of those routes. You don't have to go through your direct supervisor.
12. Cyber Security
A yacht network is now as important a system as the fuel supply — and it has attackers. The vessel keeps a separate Cyber Security Plan as part of the ISM; this section is the day-to-day behavioural rules every crew member has to respect.
Cyber risk management must be addressed in the SMS since 1 January 2021, so it is part of everyone's training baseline, not something only the IT-minded worry about.
12.1. Bring your own device (BYOD)
You will bring personal devices on board — phones, laptops, tablets. That's fine, and it's how modern crews live. But every personal device connected to the ship's network widens the attack surface, because we can't fully control what's installed on your phone.
The network rules — the segregation between crew, owner, guest and admin networks, and the banned-websites list maintained by the firewall — don't relax just because you're on a personal device. A single compromised phone or personal computer can give an attacker a foothold on the whole yacht.
12.2. Internet use
The internet is provided primarily for the Owner, the Guests and for official business. Crew get a dedicated Wi-Fi network.
- Use crew Wi-Fi only. Connecting to the Owner, Guest or Admin networks is forbidden.
- Crew use is subject to available bandwidth — when the owner is streaming a film on charter, crew bandwidth may be restricted.
- No downloads. No peer-to-peer software. No video streaming (YouTube, Netflix, similar).
- Messenger and chat apps are fine, as long as you're not burning bandwidth with video calls or heavy file sharing.
- Social media and browsing are fine; be aware some sites auto-play video, which will chew through your allowance.
- On charter, these rules may be tightened further at the Master's discretion.
12.3. Credentials
Each crew member has their own DeepBlue© login, with access limited to their role. Passwords matter:
- Follow the password policy — length, complexity, and scheduled rotation.
- Never share a password with another crew member or with anyone off the yacht.
- If you think a password has been compromised, tell the Master and the DPA straight away.
A shared password is not a shortcut. It's a way of making a future incident impossible to investigate.
12.4. If you think something is wrong
Cyber incidents usually don't announce themselves. A phishing email, an unexpected password reset, a ransomware popup, a strange device on the network — any of these is worth reporting. You'd rather be wrong and apologise than be right and silent.
If you suspect something:
- Don't power off. A running machine preserves evidence. Pull the Wi-Fi and Ethernet instead, to isolate it.
- Tell the Master and the ETO (or the DPA if ashore). Don't try to fix it quietly yourself.
- Preserve what you saw — screenshots, email, the sequence of actions that led to the alert.
- Follow the response procedure in the Cyber Security Plan. The Master or DPA will coordinate with the vessel's IT support.
13. Revision History
| Version | Date | Editor | Revision History |
|---|---|---|---|
| 1.0 | 10 Dec 2023 | Christophe Guegan | Initial commit |
| 1.1 | 16 Sep 2025 | Christophe Guegan | Refactoring |
| 2.0 | 20 Apr 2026 | Christophe Guegan | Simplified, shortened and use a narrative tone |
| 2.1 | 06 Jun 2026 | Christophe Guegan | Detail improvement. |